 |
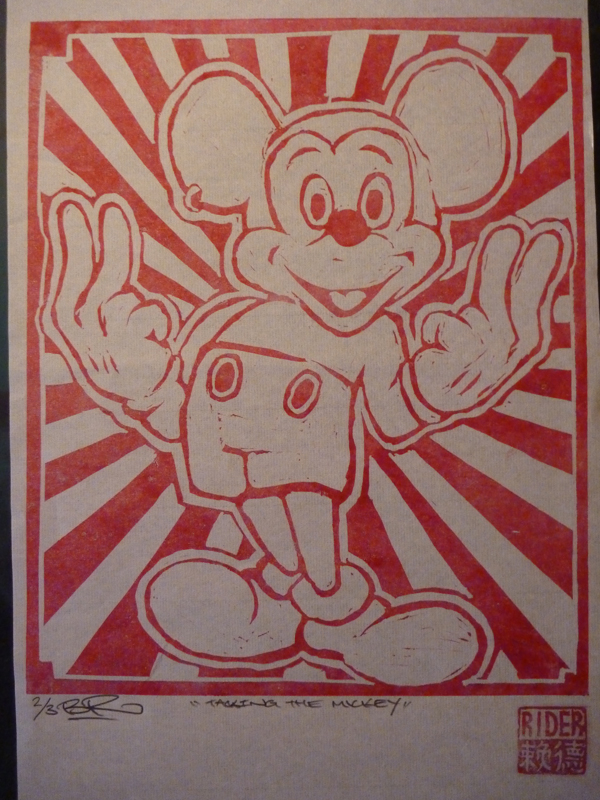
| Good ol Lino Cut. another experiment to seeing whats possible out of printmaking at home -an issue on my mind as I wont have access to printmaking facilities after this course and also to save time, if i could do this at home i could spend the day at LCC doing something else which i dont have access to. Firstly- LinoCut is rediculously easy at home and real easy to get really good results We dont need that massive victorian machine[-as brilliant as it is!] Just some inks, paper, a wood/lino cutter and a roller. barely a tenner for the whole set up!! |
 |
| I began by drawing my image onto paper, then rubbing it onto the lino itself. I never saw this but appaently this is the korean approach. here i was told to draw straight onto the lino which is also fine but i prefer the paper method, easier and better quality image |
 |
| I think the hardest part, was cutting into the lino itself, not hard, i found it quite easy to focus on it its just slighty time consuming, but not in a boring prolonged way this first stage took a good hour if not more this is the stage i handed in the lino. |
 |
| the reason i havent cut away the line but instead cut Around the lin is because it prints in reverse, |
 |
| I worked more into it. i think this image is quite funny which is one reason i did it so i wanted to add a little more impact to the nature of the image |
 |
| inks!! |
 |
| once i inked the lino with the roller i placed the paper and dragged a ruler accross it this almost embossed the paper at the same time |
 |
| the first print!! i love the first print! i was delighted to see it worked! it actually worked! |
 |
| few issues with ink on unwanted parts. i left it to retain more quality of the process |

 |
| i tried printing by just using the pressure of my hand. it did yeild a slightly different effect. .. |


 |
| tried out different papers I found thicker paper better just because it felt more solid and therefor valuable |
 |
| this is calligraphy ink.very watery. |
 |
| i though the first print was shite, but rest had a really cool quality. |


 |
| acrylic ink just ruined everything total waste of time and ink |

 |
| towards the end i had quite a simple, but good, effective set up I used a large cutting mat to roll and apply ink, and the smaller one. kept clean to print |
 |
| block printing ink. bit weird stuff. the best ink by far was the oil based ink. was a right messy bastid but gave excellent prints. |


 |
| using old canvases as a kind of makeshift drying rack. One thing ive enjoyed particuly is making do and finding new uses for things. |
Mickey with a Rider Twist - love it
ReplyDelete